
Blog
Implementing OAuth 2.0 Policy in CloudHub 2.0 for API Security
- December 3, 2025
- Smriti Sahu
Introduction
Security is a fundamental pillar of any modern integration architecture. In MuleSoft Integration, APIs are secured using policies that can be applied centrally without modifying core application code. These policies help enforce:
- Authentication
- Authorisation
- Rate limiting
- Access control and compliance
One of the most widely used standards for secure access control is OAuth 2.0. This guide explains how to implement an OAuth 2.0 Provider in MuleSoft and apply the OAuth 2.0 Access Token Enforcement Policy in CloudHub 2.0 to protect your APIs.
1. What Is the OAuth 2.0 Policy in MuleSoft?
OAuth 2.0 is an open standard for access delegation. Instead of sending credentials like usernames and passwords, clients use access tokens to access protected resources.
In MuleSoft Integration, the OAuth 2.0 Access Token Enforcement Using Mule OAuth Provider Policy ensures that only requests with valid tokens can access your APIs. This allows you to:
- Protect API endpoints from unauthorised access
- Manage authentication centrally via an OAuth provider
- Enable token-based access for different client applications
- Align with modern security and compliance standards
This article walks through implementing an OAuth 2.0 Provider app in Mule, deploying it to CloudHub 2.0, and enforcing OAuth policy in API Manager.
2. Prerequisites and Runtime Compatibility
Important Note
- Mule Runtime: 4.6.0 / 4.6.23 / 4.6.24
- Java: JDK 8
The OAuth 2.0 Provider configuration described here does not work with JDK 17 on CloudHub 2.0. If you use JDK 17, you will encounter deployment errors.
3. Developing the OAuth 2.0 Provider in MuleSoft
3.1 Create a New Mule Project
- In Anypoint Studio, create a new Mule project, e.g. mule-oauth.
- Create a main flow XML file, e.g. mule-oauth.xml.
3.2 Add Required Modules
From Mule Palette → Add Modules, add:
- OAuth2 Provider module
- Object Store module
Mule Oauth provider dependency
<dependency>
<groupId>com.mulesoft.modules</groupId>
<artifactId>mule-oauth2-provider-module</artifactId>
<version>1.0.12</version>
<classifier>mule-plugin</classifier>
</dependency>
Object Store dependency
<dependency>
<groupId>org.mule.connectors</groupId>
<artifactId>mule-objectstore-connector</artifactId>
<version>1.2.4</version>
<classifier>mule-plugin</classifier>
</dependency>
4. Create a Global Configuration File inside the src/main/mule with the name global-config.xml
Click on the global element and create two object configurations — follow the steps below in the image to store client Information in Object_store_client and to store the token information in Object_store_token
4.1 Click on the global element and click on Create.
4.2 Search for the Object store and click OK.

Object Store Configuration in global elements
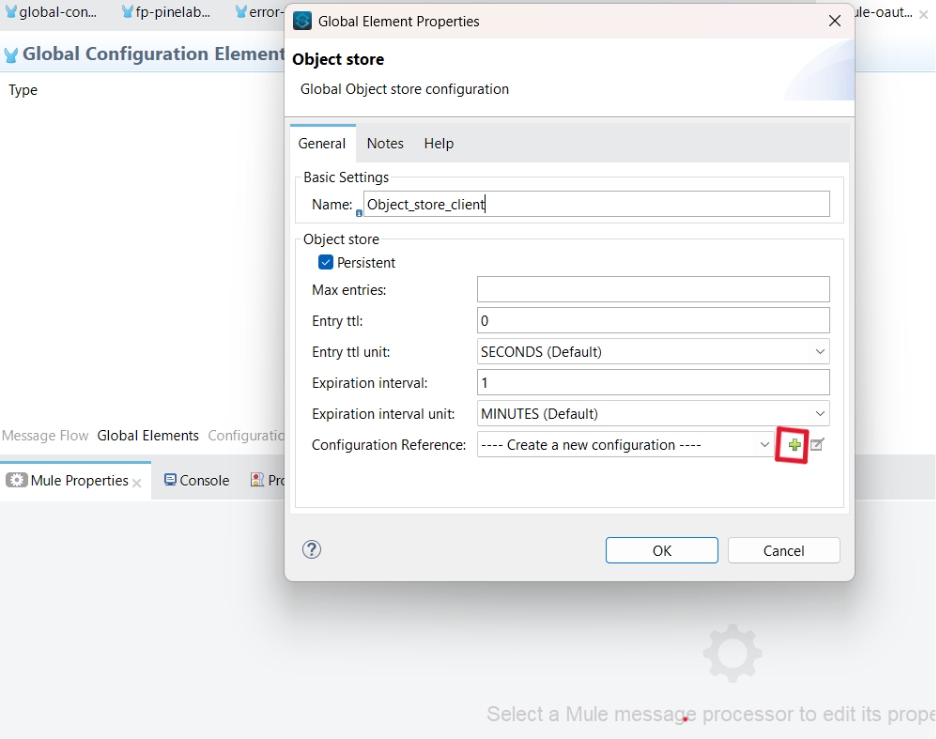
4.3 Add the information below for the client information
- name — Object_store_client
- entry ttl — 0
- expiration interval — 1
- Click on configuration reference and create a new configuration for ObjectStore Config.
Object Store Configuration in global elements
- Click on the plus button to open the ObjectStore Config window. Then, select the Connection checkbox and click OK.
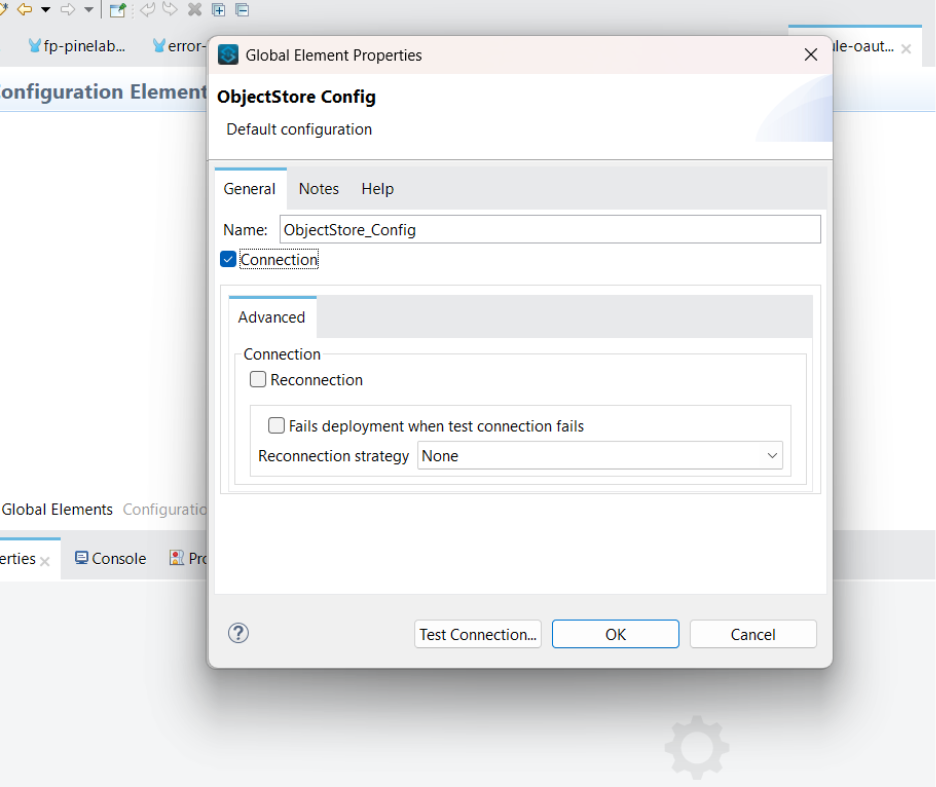
Store Configuration in global elements Object
4.4 Follow steps 4.1 to 4.3 to create the token information and give the name - Object_store_token.
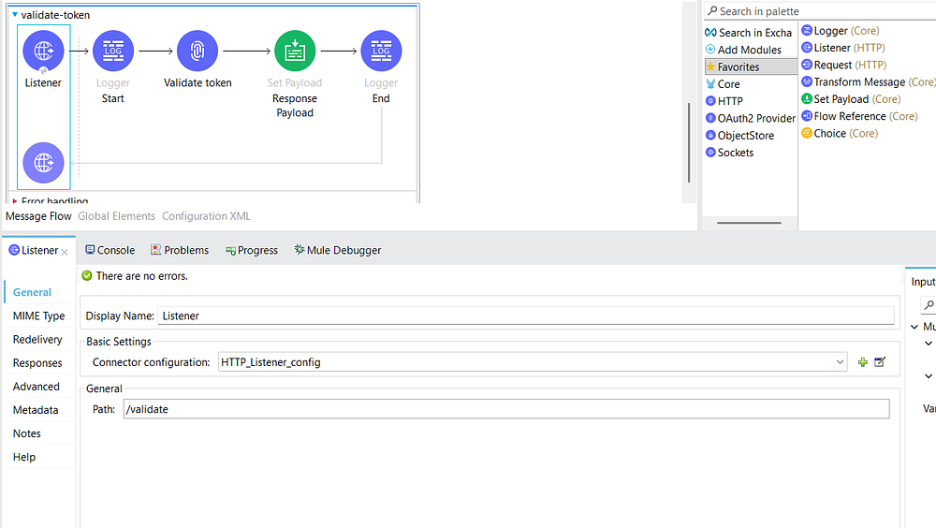
4.5. Create a listener configuration

HTTP Listener Configuration
4.6. Now it's time to create the OAuth 2 Provider configuration
4.6.1 Search the OAuth2 Provider in the global element and click on OK.
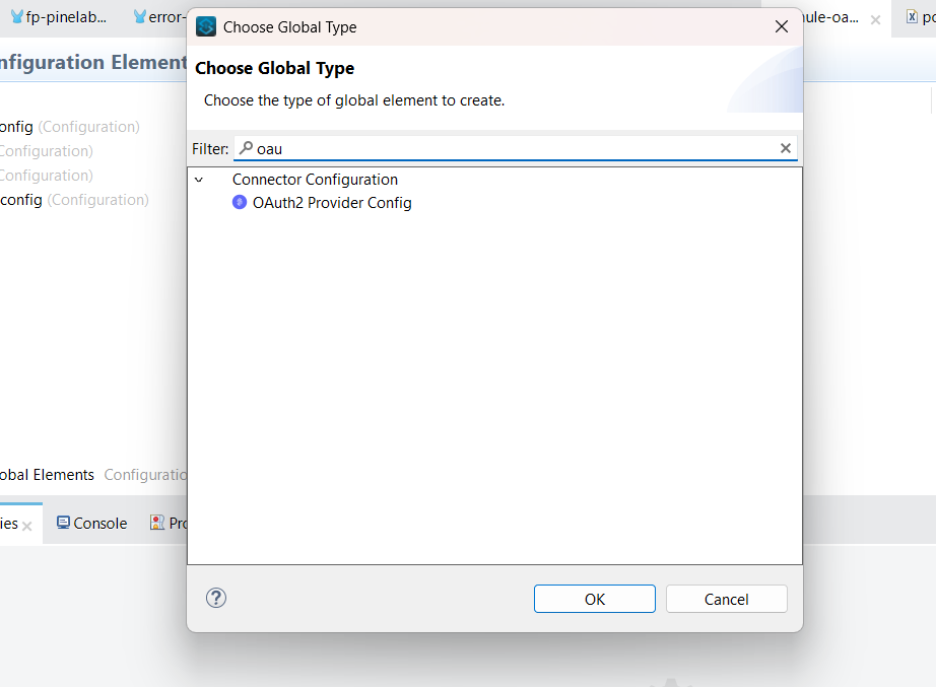
OAuth2 Provider Configuration
4.6.2 Add the information below to create the OAuth2 Provider configuration
- Listener Config — Listener Configuration that we created in step 5.
- Client store — Client Object Store that we created in step 4.3(i.e Object_store_client)
- Supported grant type:- CLIENT_CREDENTIALS
- Token Config — Edit Inline
- Path:- /token
- Token store:- Token object store we created in step 4.4(i.e. Object_store_token)
4.6.3 Now click on OK.

OAuth2 Provider Configuration
4.7. Create a new flow in the main XML file (i.e , mule-oauth.xml)

mule-oauth.xml
4.8. Configure the Listener that was created in Step 5
4.9. Add a path — /createClient
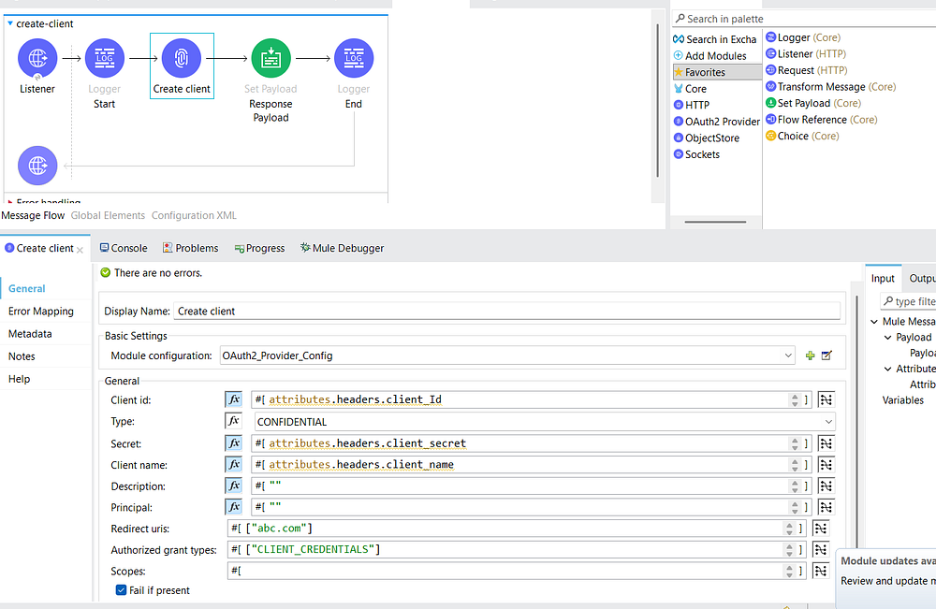
4.10. Add a create client Connector from the Mule palette and add information below-
- Name — Create client
- Module Configuration — OAuth2_Provider_Config
- Client Id — attributes.headers.client_Id
- Type — CONFIDENTIAL
- Secret — attributes.headers.client_secret
- Client name — attributes.headers.client_name
- Description — “ ”
- Principle — “ ”
- Redirect URL — [“abc.com”]
- Authorised grant type — [“CLIENT_CREDENTIALS”] (Make sure the grant_type is defined as an array.)
- Right click on the Checkbox Fail if present
mule-oauth.xml
4.11. Create another flow to validate the token
4.12. Add a Path — /validate
mule-oauth.xml
4.13. Add a Validate token Connector from the Mule palette and add the following information-
- Module Configuration — OAuth2_Provider_Config
- Access token — (attributes.headers[‘authorization’] splitBy ‘ ‘)[1]
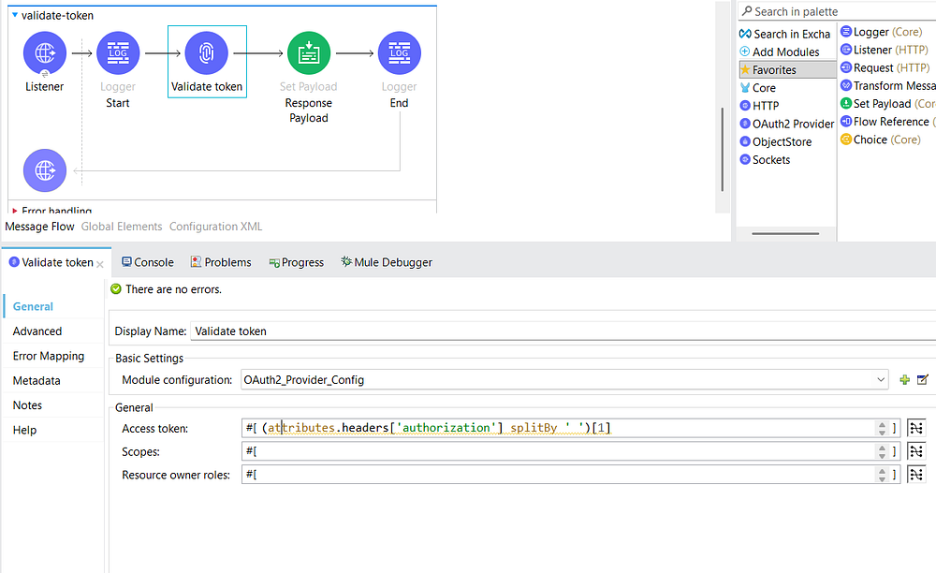
mule-oauth.xml
5.Creating a Postman Collection to test locally
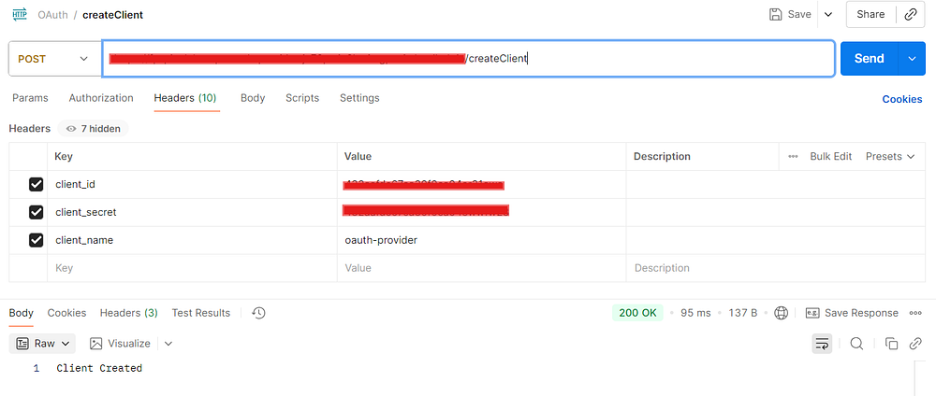
Create a client :
1. URL — http://localhost:8081/createClient
2. Header details —
- client_id
- client_secret
- client_name
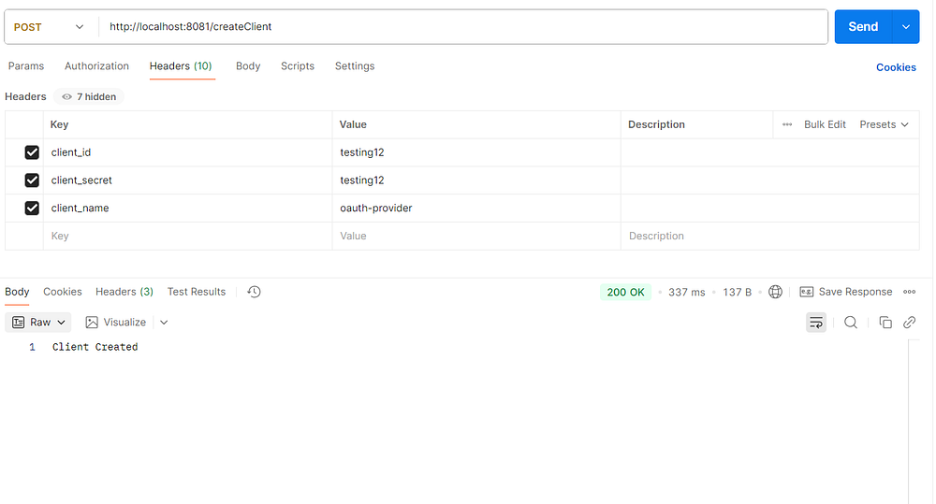
Create Client Request
The client has been created successfully.
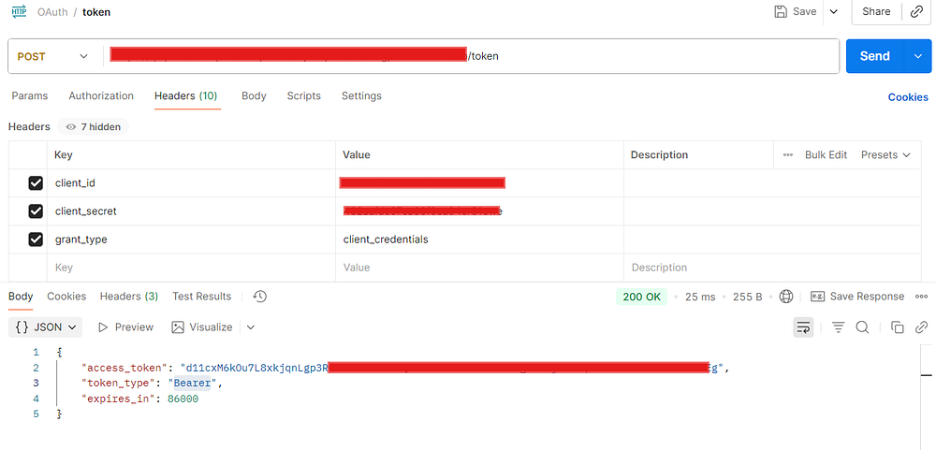
Generate Token:
- Path — http://localhost:8081/token
- header details —Ensure that the client_id and client_secret values provided in the header section match the credentials used during the client creation process.
- client_id — testing12
- client_id — testing12
- client_secret — testing12
- grant_type — client_credentials
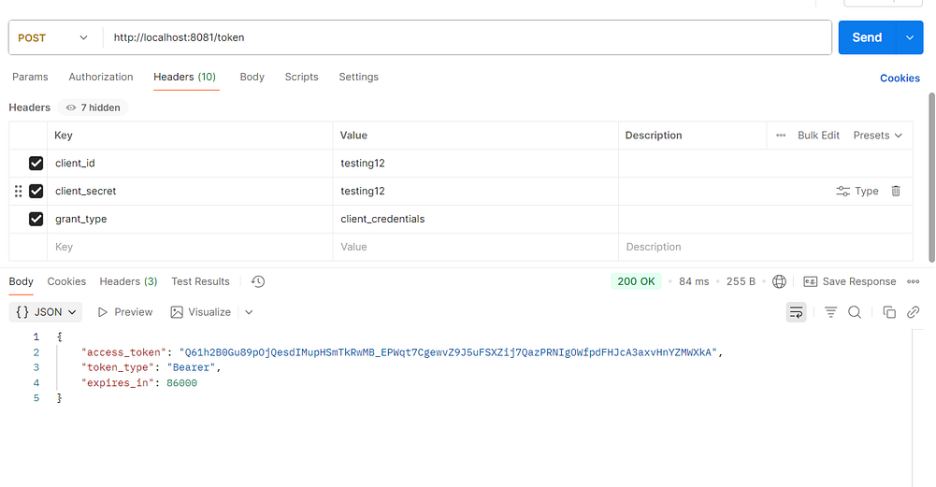
Get token Request
Validate Token :
- Path — http://localhost:8081/validate
- Authorisation —
- Auth Type — Bearer
- Copy the Access Token value and paste it into the Authorisation field under the Token type.
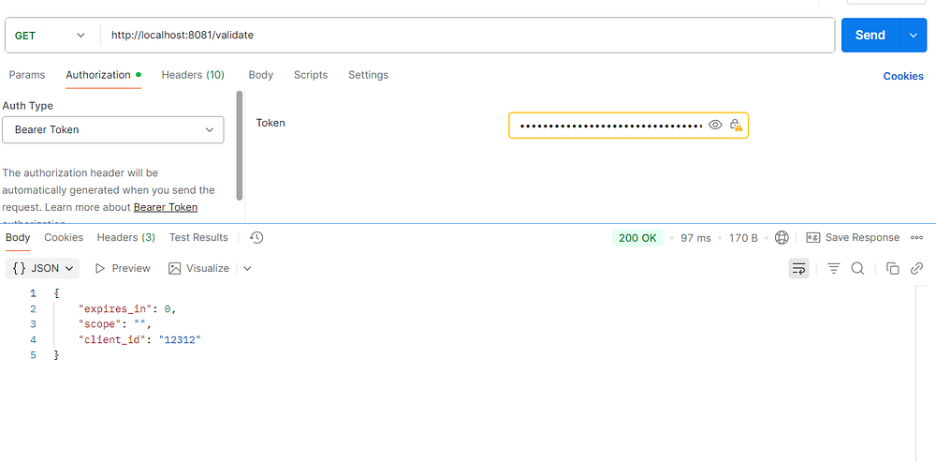
Get token Request
6. Enforcing OAuth 2.0 Security Policy in API Manager
- Export the mule-oauth application from Anypoint Studio.
- Log in to the Anypoint Platform and deploy the application.
Ensure that the Release Channel is Long-term Support, the Mule Runtime version is 4.6.0, 4.6.23, or 4.6.24, and the Java version is JDK 8 during deployment. - Once the Application is deployed, go to the API Manager.
- Select the application to which you want to apply the OAuth policy in API Manager. If your application is not available in the API instances, follow the steps below:
- Click Add
- Select Add New API
- Choose Mule Gateway
- Click Next
- Search and select your API name in the Search API field
- Click Next
- Click Next again
- Enter an example URL (optional)
- Click Next
- Click Save
- Click on the application.
- In the navigation pane, navigate to the Policies tab and click on it.
- Click Add Policy, then search for OAuth 2.0 Access Token Enforcement Policy and click on Next.
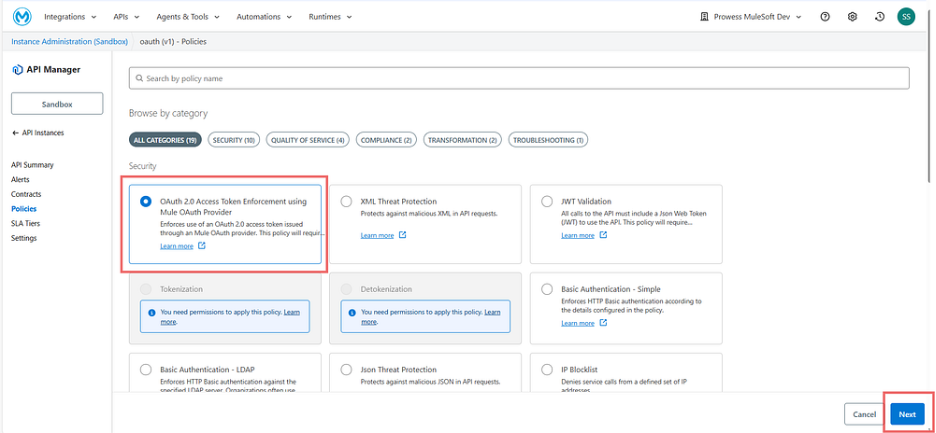
Applying OAuth 2.0 Access Token Enforcement Policy
- Now, retrieve the Public Endpoint URL from Runtime Manager for the OAuth application that was deployed in Step 2.
- Append the URL with the path ‘/validate’ in the Access Token Validation Endpoint URL field.
- Check the box Skip Client ID Validation
- Click on Apply.
Now the OAuth 2.0 Access Token Enforcement Policy is successfully applied in your application.
7. How to Test in Postman and Obtain a Valid Client ID and Client Secret?
- Go to Access Management and click Connected Apps in the navigation menu.
- Click Create App and enter a name for the connected app.
- Select App acts on its own behalf (client credentials) as the type.
- Click on Save.
- Copy the Client ID and Client Secret.
Test in Postman
- First, you need to create a client.
Use the OAuth endpoint URL with the path ‘/createClient’ to create a client in Anypoint Platform.
- Method — Post
- Eg Url — https://oauth-provider-dbel.cloudhub.io/createClient
Header Information —
- client_id — obtained from the connected app
- client_secret — obtained from the connected app
- client_name- you can provide your project name or application name.
“Note — You only need to call the /createClient endpoint once, during the initial setup.”
Test in Postman
- 2. Use the OAuth endpoint URL with the path ‘/token’ to obtain the access token.
- Method — Post
- Eg.- url — https://oauth-provider-dbel.cloudhub.io/token
Header information —
- Method — Post
- Eg.- url — https://oauth-provider-dbel.cloudhub.io/token
Get the Token
- Copy the Access Token value and paste it into the Authorisation field under the Token Type section when invoking your API.
Conclusion
The Mule OAuth 2.0 Provider combined with the OAuth 2.0 Access Token Enforcement Policy in API Manager provides a secure and standardised way to protect APIs in CloudHub 2.0.
By implementing this pattern, you:
- Enforce strong authentication and authorisation
- Centrally manage client access and tokens
- Align with modern OAuth 2.0 security best practices
- Simplify API security across environments
This approach helps ensure only authorised clients can access your APIs, strengthens data protection, and standardises security across your integration landscape.

Editor: Smriti Sahu
FAQs: OAuth 2.0 Policy in MuleSoft CloudHub 2.0
It’s an API Manager policy that enforces OAuth 2.0 token validation on incoming requests, ensuring only requests with valid access tokens can access your APIs.
It’s an API Manager policy that enforces OAuth 2.0 token validation on incoming requests, ensuring only requests with valid access tokens can access your APIs.
This implementation uses the Client Credentials grant type, which is ideal for machine-to-machine or backend service communications.
No. This configuration requires JDK 8. Using JDK 17 will result in deployment errors for the OAuth 2.0 Provider app.
Client and token information is stored using Object Store configurations (Object_store_client and Object_store_token), referenced in the OAuth Provider configuration.
No. The /createClient endpoint is typically used once per client during initial setup. After that, you only request tokens via /token.
In the policy configuration, set the Access Token Validation Endpoint URL to your OAuth Provider’s public URL with the /validate path appended.
Create a Connected App in Access Management → Connected Apps, choose client credentials type, and copy the Client ID and Secret from there.
Yes. Multiple APIs can share the same OAuth Provider instance and policy, allowing centralised token validation across services.
The article focuses on CloudHub 2.0. The core concepts are similar, but you must ensure runtime, deployment model, and JDK compatibility for each environment.