

Blogs
How to Create a Mule Domain Project in Mule 4
- May 14, 2024
- MuleSoft
A Mule domain project in Mule 4 allows multiple Mule applications running on the same on-premises Mule runtime to use shared global configurations from one centralised domain. Instead of maintaining separate HTTP Listener, HTTP Request, connector, property, scheduler pool and error-handler configurations in every application, development teams can define reusable resources once and reference them across associated Mule applications.
In this step-by-step guide, you will learn how to create a Mule domain project in Anypoint Studio, configure shared HTTP resources, associate Mule applications with the domain and verify the domain dependency in the pom.xml file. The article also explains the benefits, prerequisites and limitations of MuleSoft domain projects, along with important connector-version considerations for testing and deployment.
What is a Mule Domain Project?
A Mule domain project is a centralised project that stores shared configurations and resources for multiple Mule applications running on the same Mule runtime. It can contain reusable global configurations such as HTTP Listener and HTTP Request configurations, connector settings, Mule properties, default error handlers and scheduler pools.
By associating Mule applications with the same domain project, development teams can reduce duplicated configurations and maintain consistent settings across applications. However, a domain project is intended for shared configurations and cannot be used to share flows, subflows or message processors.
MuleSoft Domain Projects for Shared Connectors and Reusable Configurations
MuleSoft domain projects provide a structured way to implement and manage shared connectors and reusable configurations across multiple Mule applications. By following Mule domain project best practices, development teams can reduce configuration duplication, maintain consistency and simplify the management of applications running on the same on-premises Mule runtime.
Key Benefits of Domain Projects
1. Shared Resources: Domain projects allow the definition and management of common resources such as connectors, error handlers, and properties required by multiple Mule applications. By consolidating resources, domain projects ensure consistency and simplify management, with changes automatically reflecting across all associated applications.
2. Reusable Configurations: Domain projects promote component and configuration reuse, minimizing redundancy and facilitating scalability. They maintain a clear separation between shared resources and application-specific configurations, enhancing modularity and simplifying maintenance.
3. Versioning and Governance: Like other Mule projects, domain projects support versioning and governance features, enabling effective change tracking, policy enforcement, and dependency management. This ensures better consistency, reusability, and manageability, especially in environments with interconnected applications relying on common configurations and resources.
How to Create a Mule Domain Project in Anypoint Studio
Follow these steps to create and configure a Mule domain project in Anypoint Studio.
Step 1: Create a Mule domain project in Anypoint Studio.
Open Anypoint Studio, click on “File”> “New”> “Mule Domain Project”. Enter your domain project name as per your requirement and click on “Finish.”
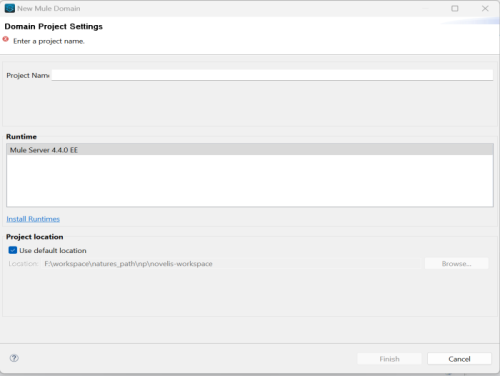
You will see a canvas like this after the project is created.

You’ve probably noticed that this canvas isn’t like a normal canvas where we create our flow, i.e., the “Message Flow” tab. Here we could not find that particular tab. Also, the underlying XML of the domain project starts and ends with “domain:Mule-domain,” whereas normal Mule XML starts and ends with the “Mule” tag.

Step 2: Configure the shared resources.
Click on the “Create” button, and you will see a window where you can search for the configurable connector.
Whenever we search for “HTTP” for the first time, we can’t find anything. So, for that, we need to click on manage modules, to load the required module, choose one of these 3 options.
- From Exchange
- From Featured Modules
- From Maven
In this demo, we are using “from Exchange”.


To activate the HTTP module, first, click “Apply” followed by “Apply and Close.” The HTTP module is automatically integrated into projects utilizing socket connectors and is also compatible with HTTP connectors. Ensure to take note of the versions of both connectors; in this instance, the socket connector is version 1.2.4, while the HTTP connector is version 1.9.2.
With the required modules enabled, proceed to click “Create” to generate shareable resources. Following this, perform another search for “HTTP.”

After adding the HTTP module, click Create and search for HTTP. Select HTTP Listener Config, click OK and configure the host, port and other settings based on your application requirements. For this example, the shared configuration is named test-domain-http-listener-config.
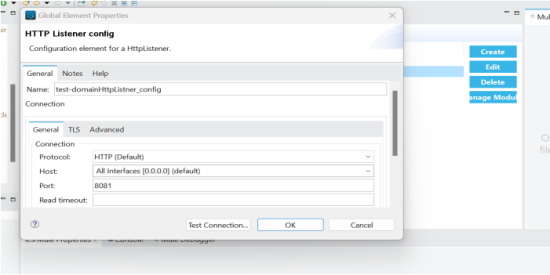
You can configure an HTTP Request Config in the same way when multiple associated Mule applications need to use the same outbound HTTP connection settings.
In the same way, you can configure the HTTP Request
Step 3: Create and Associate a Mule Application with the Domain
Create a new project by clicking on “File,” click on “New,” select and click on “Mule Project,” and then enter your domain project name as shown in the attached screenshot as “test-child.” as shown in the screenshot below.
To initiate the flow, navigate to the canvas. Prior to proceeding, ensure compatibility between the HTTP connector versions of both the calling application and the domain project. Incompatibility may result in errors, as different connector versions cannot coexist within the same project. The HTTP connector version utilized here is 1.9.2.
Begin by dragging an “HTTP listener” and an “HTTP request” connector onto the canvas, along with a “transform message” and a “logger.”
Configure the “HTTP listener” by selecting the appropriate connector configuration established in the domain project and assigning a path. In this instance, “test” will serve as the designated path.
Similarly, configure the “HTTP request” connector, selecting the appropriate configuration from the drop-down menu and making any additional adjustments necessary to interact with the API.

To retrieve the global configuration of the domain project, begin by directing it from the calling application. Right-click on the calling project, in our case “test-child-api“, proceed to “properties”, and select “Mule Project”. In the subsequent window, opt for the Domain option to select your domain API, apply the changes, and then close the window.

To view the changes made in the project, refer to the pom.xml file after accessing it through the domain API or any other applicable method.


Upon completing development, testing is the next step. You will execute the “test-child-api” calling API.
After completing the configuration, run the associated Mule application from Anypoint Studio. By default, Studio deploys the required domain project together with the associated application. Confirm in the console that both the Mule domain and application have been deployed successfully.
Next, test the configured endpoint using Postman. Verify that the application can reference the shared HTTP Listener and HTTP Request configurations without connector-version or dependency errors. For standalone Mule runtime deployment, deploy the domain JAR to the MULE_HOME/domains directory and the associated application JARs to the MULE_HOME/apps directory.


Now, the deployment testing can be done for the connector versions utilizing Postman. After domain initiatives have been successfully deployed and tested, data retrieval becomes feasible.
Important Limitations of Mule Domain Projects
Mule domain projects are designed for Mule applications running on the same on-premises Mule runtime. A Mule application can be associated with only one domain at a time. Domains can share global configurations, properties, scheduler pools and connector configurations, but they cannot be used to share flows, subflows or message processors. Connector and module versions must also remain compatible between the domain project and its associated applications.
Conclusion
A Mule domain project provides a centralised way to share global configurations and reusable resources across multiple Mule applications running on the same on-premises Mule runtime. By defining shared HTTP Listener, HTTP Request, connector, property and error-handler configurations within the domain, development teams can reduce duplication, maintain consistency and simplify application maintenance.
In this guide, we covered how to create a Mule domain project in Anypoint Studio, configure shared HTTP resources, associate a Mule application with the domain and verify the dependency in the pom.xml file. Before deployment, ensure that the domain and its associated applications use compatible Mule runtime, module and connector versions. When used for the right on-premises integration architecture, MuleSoft domain projects can improve resource reuse, dependency management and long-term maintainability.