
To perform custom manipulations and logic in a process and to accomplish unique and advanced requirements that fail outside of the native functionality of the Boomi platform, Custom scripting is been written. Such integrations need custom files, a third–party custom scripting libraries or specific libraries for connectors.
Custom Library components are collections of Java Archive (JAR) files that you can use to support those in Boomi integration processes.
Creating and deploying Custom Library components enables you to manage JAR files through the Boomi Integration UI. You can deploy Custom Library components to any Atom, Molecule, Atom Cloud, or environment.
To configure the custom library in atom management below are the steps:
Upload external libraries to the Boomi account:
Setting>Account details>manage Account libraries>upload a JAR file.
Create a custom library component in Boomi:
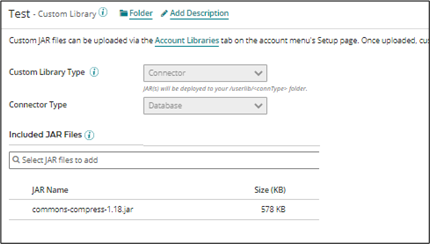
In custom librarytype in Boomi, we have three types of components: General, Scripting and Connector.
Click on create new Custom Library Component from the process and in the configuration tab, define Custom library, Component Name, and Folder and click on create. Once you create a component in dropdown list select the library we want to create, if we select customer library type as a connector, we have to provide connector type and we can add JAR files from the previously uploaded custom JAR files and click on save.
 Deployment of the custom library component:
To Deploy the Custom library: Create Package component with all details and create it.
Once all package components successfully created, click on the Attachments tab to attach environment and version and click on Deployment tab to deploy the component.
Deployment of the custom library component:
To Deploy the Custom library: Create Package component with all details and create it.
Once all package components successfully created, click on the Attachments tab to attach environment and version and click on Deployment tab to deploy the component.
 Restart Atom:
Before you can use the library in your integration process, we will need to restart the atom. Manage > Atom Management >
Select an atom > click on Atom information tab > click on “Restart Atom”.
Removing files from a custom library:
You can remove custom JAR files from a Custom Library component, but you should not do so if the component is currently deployed.
Custom library component > Select Jar File > Delete > Save.
Migrating existing JAR files to use custom libraries:
Existing JAR files that were placed in user library folders manually continue to work as they did before the introduction of Custom Library components. However, as a best practice, Boomi recommends that you migrate any manually deployed JAR files to custom libraries that can be managed through the Boomi Integration UI.
To make existing JAR files known to Boomi Integration, follow the normal custom library deployment flow:
Upload JAR file > Create Custom library component > Deploy.
When the JAR files are deployed, Boomi Integration checks for existing files of the same name:
Restart Atom:
Before you can use the library in your integration process, we will need to restart the atom. Manage > Atom Management >
Select an atom > click on Atom information tab > click on “Restart Atom”.
Removing files from a custom library:
You can remove custom JAR files from a Custom Library component, but you should not do so if the component is currently deployed.
Custom library component > Select Jar File > Delete > Save.
Migrating existing JAR files to use custom libraries:
Existing JAR files that were placed in user library folders manually continue to work as they did before the introduction of Custom Library components. However, as a best practice, Boomi recommends that you migrate any manually deployed JAR files to custom libraries that can be managed through the Boomi Integration UI.
To make existing JAR files known to Boomi Integration, follow the normal custom library deployment flow:
Upload JAR file > Create Custom library component > Deploy.
When the JAR files are deployed, Boomi Integration checks for existing files of the same name:
Deployment of the custom library component:
To Deploy the Custom library: Create Package component with all details and create it.
Once all package components successfully created, click on the Attachments tab to attach environment and version and click on Deployment tab to deploy the component.
Restart Atom:
Before you can use the library in your integration process, we will need to restart the atom. Manage > Atom Management >
Select an atom > click on Atom information tab > click on “Restart Atom”.
Removing files from a custom library:
You can remove custom JAR files from a Custom Library component, but you should not do so if the component is currently deployed.
Custom library component > Select Jar File > Delete > Save.
Migrating existing JAR files to use custom libraries:
Existing JAR files that were placed in user library folders manually continue to work as they did before the introduction of Custom Library components. However, as a best practice, Boomi recommends that you migrate any manually deployed JAR files to custom libraries that can be managed through the Boomi Integration UI.
To make existing JAR files known to Boomi Integration, follow the normal custom library deployment flow:
Upload JAR file > Create Custom library component > Deploy.
When the JAR files are deployed, Boomi Integration checks for existing files of the same name:
- If the file name and the contents of the file are the same, the file is not replaced.
- If the file name is the same but the contents are different, the new JAR file is deployed with a unique suffix to avoid a naming conflict. The existing file is marked for deletion.