MULE COMMON PROCESSES

Mule Common Processes

Purpose:

Many customers create shared libraries which contain flows, sub-flows, etc. to be re-used across the Mule projects. For example, common sub-flows can be used for logging, error-handling, shared business logic, etc. This article aims to provide information and guidance on how to create and import common libraries in Mule 4.

Below topics are covered in this article. 

  • Creating a common Library
  • Publish common library as custom connector to anypoint exchange
  • Import exchange asset to anypoint studio and use it another project

1. Creating a common Library:

Create a sample mule project (ex: commonlibrary) with two flows. One flow is error-flow.xml and another is log-flow.xml as shown in below pic.

Picture1

We need to do below necessary changes in pom.xml to make this project ready for publishing.

  • Modify the groupId of the Maven project to be your Organization ID in your project’s POM filePicture2
  • Ensure that below plugin is added to pom.xml

<plugin>

<groupId>org.mule.tools.maven</groupId>

<artifactId>mule-maven-plugin</artifactId>

<version>${mule.maven.plugin.version}</version>

<extensions>true</extensions>

<configuration>

<classifier>mule-plugin</classifier>

</configuration>

</plugin>

  • Add the below Maven facade as a repository in the distribution management section of your project’s POM file.

<distributionManagement>

<repository>

<id>Repository</id>

<name>Corporate Repository</name>

<url>https://maven.anypoint.mulesoft.com/api/v1/organizations/${project.groupId}/maven</url>

<layout>default</layout>

</repository>

</distributionManagement>

  • Update the settings.xml file in your Maven .m2 directory. After you install Maven, the mvn clean command creates the .m2 directory. In Windows, the directory resides at <default-drive>\Users\YOUR_USER_NAME\.m2 that contains your Anypoint Platform credentials. The Maven client reads the settings file when Maven runs. (Assumption is that you have maven already installed)

Please note that <id> value in settings.xml must match with <id> value in distributionManagement section of pom.xml

<?xml version=”1.0″ encoding=”UTF-8″?>

<settings xmlns=”http://maven.apache.org/SETTINGS/1.0.0″

          xmlns:xsi=”http://www.w3.org/2001/XMLSchema-instance”

          xsi:schemaLocation=”http://maven.apache.org/SETTINGS/1.0.0 http://maven.apache.org/xsd/settings-1.0.0.xsd”>

  <servers>

    <server>

      <id>Repository</id>

      <username>myusername</username>

      <password>mypassword</password>

       </server>

  </servers>

</settings>

2. Publish common library as custom connector to anypoint exchange

  •  Go to the folder where pom.xml is present. Execute the command mvn deploy.

Picture3

  • Once the command is executed is successfully, go to anypoint exchange. There you will see commonlibrary asset is reflected. Now this asset is ready to be imported to anypoint studio.

Picture4

3. Import exchange asset to anypoint studio and use it another project 

  • Create a new mule project. (ex: muleproject). In Mule palette section click on Search in Exchange (as shown below).

Picture5

  • Another pop up will open. Enter the asset name (commonlibrary in our case) you want to import and add and click on finish. After that you will see that corresponding POM dependency gets added to POM.xml

Picture6

  • With Maven Facade you can consume connectors, Mule applications, and REST APIs published in Exchange. To consume an Exchange asset, add the Maven facade as a repository in the repositories section of pom.xml

<repository>

<id>Repository</id>

<name>Corporate Repository</name>

<url>https://maven.anypoint.mulesoft.com/api/v1/organizations/ORNIZATION_ID/maven</url>

<layout>default</layout>

</repository>

  • Now, to be able to import, it is necessary to create an “Import” configuration, which contains the name of the Mule configuration file that contains the sub-flow we want to use, in this case error-flow.xml, log-flow.xml are the ones we created.

Picture7


Picture8

  • This will make imported sub-flows “Logger”, “Error” visible from the library in our Mule application as flow-reference, as depicted below

Picture9

BATCH PROCESSING IN MULESOFT

BATCH PROCESSING IN MULESOFT

Background

MuleSoft supports processing of messages in batches. This is useful for processing large number of records. MuleSoft has many processors for specific usage in batch processing and implementing business logic. When the batch job starts executing, mule splits the incoming messages into records and stores them in a queue and schedules those records in blocks of records to process. By default, a batch job divides payload with records of 100 per batch, and it concurrently processes using a max of 16 threads. After all the records have passed through all the batch steps, the runtime ends the batch job instance and reports the batch job result indicating which records succeeded and failed during processing.

Batch processing has three phases in Mule 4. 

  • Load and Dispatch
  • Process
  • On Complete

Load and Dispatch

This is an implicit phase. This phase creates a job instance, converts the payload into a collection of records and then splits the collection into individual records for processing. Mule exposes batch job instance id through the “BatchJobInstanceId” variable, this variable is available in every step. It creates a persistent queue and associates it with new batch job instance. Every processed record of the batch job instance starts with the same initial set of variables before the execution of the block.

After each record is processed in this phase, the flow continues to execute the dispatched records, asynchronously. It does not wait for the rest of the records to be processed.

Process

In this phase, the batch job instance processes all individual records asynchronously. Batch step in this phase allows for filtering of records. The record goes through a set of Batch Steps that has a set of variables within the scope of each step. A Batch aggregator processor may be used to aggregate records into groups by setting aggregator processor size. There are many processors that could be used to customize the batch processing behavior. For example, an “Accept Expression” processor may be used to filter out the records that do not need processing, any record that evaluates to “true” is forwarded to continue processing.

A Batch job processes large number of messages as individual records. Each Batch Job contains functionality to organize the processing of records. Batch job continues to process all the records and segregates them as “Successful” or “Failed” through each batch step. It contains the following two sections, “Process Records” and “On Complete”. The “Process Records” section may contain one or more “Batch Steps”. Any record of the batch job goes through each of these process steps. After all the records are processed, the control is passed over to the On Complete section.

On Complete

On Complete section provides summary of the processed record set. This is an optional step and can be utilized to publish or log any summary information. After the execution of entire batch job, the output becomes a BatchJobResult object. This section may be used to generate a report using information such as the number of failed records, succeeded records, loaded records, etc.

Batch Processing Steps 

  • Drag and drop flow with http listener and configure the listener.
  • In the example below, 50 records are added to the payload that will be processed.
  • “Batch Job” processor is used to process all the records from the payload. Each “Batch Job” contains two parts – (1) Process Records and (2) On Complete
  • In the “Process Records” the batch step is renamed as Step1. In process records we have multiple batch steps.
  • Below screenshot shows multiple batch steps.

  Picture1

  • In all the batch steps there is an “Accept Policy” i.e., whether the next step accept or not decided by the “Accept Policy”. There are three values in “Accept Policy”.
  • “NO_FAILURES” (default) i.e., Batch step process only succeeded records.
  • “ONLY_FAILURES” i.e., Batch step process only failed records.
  • “ALL” i.e., Batch step process all the records whether it is failed to process.
  • There is an “Accept Expression” in the batch step it has to evaluate to true, then only the record accepted by the next step.
  • There is a need to aggregate bulk records, use “Batch Aggregator” by specifying aggregator size as required.
  • Below screenshot shows how to configure the batch aggregator.

Picture2

  • Use the logger in the batch aggregator and the configure it.
  • All the steps are executed, then the last phase of the job called as “On Complete” will trigger.
  • On Complete phase, there is a BatchJobResult object gives information about, exceptions if any, processed records, successful records, total number of records.
  • We can use this BatchJobResult object to extract the data inside it and generate reports out of it.
  • Below screenshot shows the BatchJobResult.

Picture3

  • In On Complete phase, if we configure the logger as Processed Records then it will process the Processed Records.
  • Run the mule application
  • Give the request in order to trigger the batch job. The batch job sends the payload as one by one records to batch step.
  • The screenshot shows the logs in the console.

Picture4

Performance Tuning

Performance tuning in mule involves analyzing, improving, validating the millions of records in single attempt. Mule handled to process huge amount of data efficiently. Mule 4 erase the need of manual thread pool configuration as this is done automatically by the mule runtime which optimizes the execution of a flow to avoid unnecessary thread switches.

Consider there are 10 million records to be processed in three steps. Many input operations occur during the processing of each record. The disk characteristics along with workload size, play a key role in the performance of the batch job because during the input phase, an in-disk queue is created of the list of records to be processed. Batch processing requires enough memory available to process threads in parallel. By default, the batch block size is set to 100 records per block. This is the balancing point between the performance and working memory requirements based on batch use cases with various record sizes.

Conclusion

This article show cased the different phases of batch processing, batch job and batch steps. Each batch step in a batch job contains processors that act upon a record to process data. By leveraging the functionality of existing mule processors, the batch step offers a lot of flexibility regarding how a batch job processes records. Batch Processing used for parallel processing of records in MuleSoft. By default, payload divides 100 records a batch. By matching the number of records with respect to the thread count and input payload the batch processing is achieved.

HOW TO CREATE GUIDED DECISION TABLE IN DROOLS

How to create Guided Decision Table in Drools

1. Create new project UPLOAD <project-name>.
2. Add data object asset (e.g., upload).

Picture1

3. Add asset Guided Decision Table using “Add asset” option from home page.
4. Enter GDT name, choose package and select an option from Hit Policy drop down. You can select from any of the listed policies based on the requirement. In this example, we are using First Hit.

Picture2

5. Click OK button, then you will see the GDT as below.

Picture3

6. Insert columns by clicking on Columns tab, there will be a popup window as below.

Picture4

7. We should configure the mentioned options as in below screenshot.
Picture5
7.1 New Column:
Add a condition -> next ->
7.2 Pattern:

Picture6

Then click on create a new fact pattern button, it will show a new popup.

Picture7

We must provide the Binding value and click Next.

Picture8

7.3 Calculation type:
Select literal value radio button and click next.
You can select other options based on your requirement.

Picture10

7.4 Field:
Choose field value from dropdown and Binding is optional.

Picture11

7.5 Operator:
Choose equal to option from drop down and then next

Picture12

7.6 Value options:
Here we can provide multiple options with comma separate in value list. Then it will show in Default tab in drop value like below.

Picture13

I have given gold and diamond; it is showing same in drop down. Then click next.
7.7 Additional Info:
Header filed is mandatory filed and click finish button.

Picture14

8.Below is the table structure.

Picture15

9. Here we can add rows using Append row under insert button drop down.

Picture16

10. We can add multiple rows using same option. And if we double click on gold tab it shows list of options which are, we added in previous steps.

Picture17

11. Do not forget save.

Picture18

12. Using above steps, we can add multiple columns as per our requirement.
13. Here adding one more column action.
14. Click on insert tab and choose insert column.

Picture19

15. Select set the value of a field and click on next.

Picture20

16. Choose upload[auto] pattern by clicking dropdown of pattern filed and then click next.

Picture21

17. Select discount filed from field dropdown.

Picture22

18. Provide optional values then it will show in drop down like below.

Picture23

19. Given Header description as Action and click Finish.

Picture24

20. Below is the GDT final structure.

Picture25

21. Click on save button and then click on validate button and it should be successfully validated.

Use Test Scenario Asset for testing instead of POSTMAN:

1. Once deployment got completed, add Test Scenario Asset using add asset option.
2. Below is the normal Test Scenario Asset.
Picture26
3. We provided condition and action details below.

Picture27

4. Then start testing using play option and the response is like below.

Picture28

5. If something is wrong, it will show like below.

Picture29

CI-CD EMAIL ALERT CONFIGURATION ON SPECIFIC FILE CHANGE

CI/CD Email Alert Configuration on Specific File Change

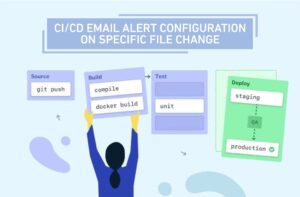
Background:

A notification has to be sent to the developer who made a commit to a configuration file, such that the retrofit of the file to the other repos would not be missed and there by avoid issues upfront. At present in git there is a feature for notification by using the “GIT Integrator service call email on push”. However, this service is not able to restrict the mail notification to a particular file change which is creating the issue as the inboxes are flooded with emails for every check-in.

Steps to achieve

  • To configure an email notification for any specific file changes during git commit, we can use git tag “only”. Following is an example for the git script which is used for the same.

send_email: —-Git Stage

  stage: notify

  only: —-Git Command Only

    changes:

      – sb/temp/azu/*.prop

  script:

    – echo `git log -p -2 *.prop | head -50 > commit_history.txt`

    – |

      if [[ -z “$REPO”]]; then

         curl -s –user “api:$API_KEY” “https://api.mailgun.net/v3/$DOMAIN/messages” -F from=’Gitlab <gitlabsuer@domain.com>’ -F to=$GITLAB_USER_EMAIL -F to=$GITLAB_USER_TLD -F to=$GITLAB_USER_NLD -F cc=$GITLAB_USER_TWO -F cc=$GITLAB_USER_PM -F subject=’Gate Property file Modified’ -F text=’Retrofit property files to other Repos’ -F attachment=’@commit_history.txt’

      else

         echo “It’s not allowed to trigger”

      fi

  • In the above yml code snippet, it’s the “only” tag where we have condition for the execution of the script. Whenever there is a change in the property files then immediately it recognizes the change and triggers this job.
  • An Email is sent using the mail gun service provider for the particular property file change. Without having our own SMTP Service provider, we can create an account in the Mail gun, it provides an API which can be hit with the required parameter such that it does the job of sending notification for us. It’s a pretty cool feature and easy to use. The service is ‘Free’ for a couple of months that is accompained with 5000 emails per month.
  • Sample curl command to hit the email API:

curl -s –user “api:$API_KEY” “https://api.mailgun.net/v3/$DOMAIN/messages” -F from=’Gitlab < gitlabsuer@domain.com >’ -F to=$GITLAB_USER_EMAIL -F to=$GITLAB_USER_TLD -F to=$GITLAB_USER_NLD -F cc=$GITLAB_USER_TWO -F cc=$GITLAB_USER_PM -F subject=’Property file Modified’ -F text=’Retrofit property files to other Repos’ -F attachment=’@commit_history.txt’

  • Private Key and service domain from Mailgun are required to put them in yml. Below steps help us to find the following things from mail gun.
  • Create an account with mail gun using the below link:

1. https://signup.mailgun.com/new/signup  (Don’t click on the Add payment info now, we can sign up to the site without credit/debit card details.)

2. Provide all the sign-up details like email and name

3. Once login you will be able to see the below screen:

Picture1

4. Once login you will be able to see the below screen:

Picture2

5. Click on the domain then you will be able to see the domain name, also, in the right side we will have the recipients where we have to add the mail id of the person to whom the notification should be sent, currently, using free account we can only send it to 5 people.

Picture3

6. Click on the setting and then API keys to get the private key:

Picture4

7. All the variables are given in the GITLAB-UI under settings/ci-cd/variables as a global part.

Picture5

  • We can also use the smtp parameters instead of the API: sample for the same is below:

./swaks –auth \

        –server smtp.mailgun.org \

        –au postmaster@sandbox43a6751f9b1c43faaf8fa187eadc3a0f.mailgun.org \

        –ap 583627bfa8d4a292c4aa779f9b61aafb-ba042922-a9cb1219 \

        –to recepient@domain.com \

        –h-Subject: “Alert!!! Property file changed” \

        –body ‘check the commits’

Reference: https://documentation.mailgun.com/en/latest/

PROCESSING X12 EDI DATA IN MULE 4

Processing X12 EDI data in Mule 4

Background

X12 EDI is a data format based on ASC X12 standards developed by the American National Standards Institute (ANSI) Accredited Standards Committee (ASC). It is used to electronically exchange business documents in specified formats between two or more trading partners. EDI Data is widely used in logistics and Healthcare industries.

In this article, we shall see how an X12 EDI document is parsed and converted into an XML document. The following Connector is used from Anypoint Exchange for working with X12 data – “X12 Connector – Mule 4”.

Steps

The following steps are performed for working with EDI documents

  1. Create a project and import X12 Connector
  2. Create a Mule flow that reads the X12 data, parses, and transforms it into XML format

1.  Create a project and import X12 Connector

  • Open Anypoint studio and create a project.
  • In the new project, click on Search in Exchange (highlighted in yellow). This is to import X12 Connector – Mule 4 from exchange to studio

Picture1

  • In the dialog box that is opened, click on Add Account, to enter the credentials for Anypoint platform if not already saved.

Picture2

  • After Anypoint platform credentails are entered, you are now connected to Anypoint exchange from your Anypoint studio.
  • Type x12 as shown in below picture. And select X12 Connector – Mule 4 and click on add and then finish

Picture4

  • X12 Connector – Mule 4 is now successfully added to your studio from exchange.


2. Create a Mule flow that reads the X12 data, parses, and transforms it into XML format

  • Create a mule flow like below with the below processors
  • X12 Read reads EDI payload that is received from Listener

When an X12 Read processor is executed, it generates an object with the schema as shown in the screenshot below

Picture7

  • Transform message reads the output of X12 Read and converts it to XML payload.

Picture8

  • Run the mule flow in studio either in run or debug mode.
  • Use Postman (or any tool of your choice) to test the above REST API flow. Screenshot below.
  • In Body section, enter the EDI payload of any type and invoke the mule flow running in the Anypoint studio.
  • The X12 Processor parses the data and returns the data as a Java Object.
  • Using a Transform Message processor, as seen above, the object is converted into XML format. In general, the output of “X12-Read” may be transformed into any other data format (e.g., JSON) that the application must work with.
  • Screenshot below shows the input EDI and output XML after it is transformed.

Picture9

Conclusion

As seen in the flow, the parsing and processing of EDI data to other formats using the X12 Connector is straight-forward. In practice, for file-processing with large number of EDI transaction sets, a file-based batch processing is used, and each transaction is parsed separately using EDI X12 Read Processor before further processing is done.

The screenshot below shows the expected output for X12-Write processor.

Picture10

After the EDI data is read using the X12-Read processor, and the transaction processing is complete, the response data may have to be formatted back to EDI. To generate an EDI response, a Java Object with the above schema is built (screenshot above), This “Expected” Object is provided as an input to “X12 – Write” processor that transforms data into EDI format, which can then be used for response.

In the next part of the article, we shall delve into the details of trading partner setup for exchange of EDI documents and customizing EDI validation rules. So, stay tuned!